Digital Photography & Imaging's Exercise
30/08/18 - 19/10/18
(Week 01 - Week 8)
Fong Ee Xuan (0332842)
Digital Photography & Imaging
Exercise
LECTURES AND EXERCISE
HEARST MANSION
Week 01
28/08/18
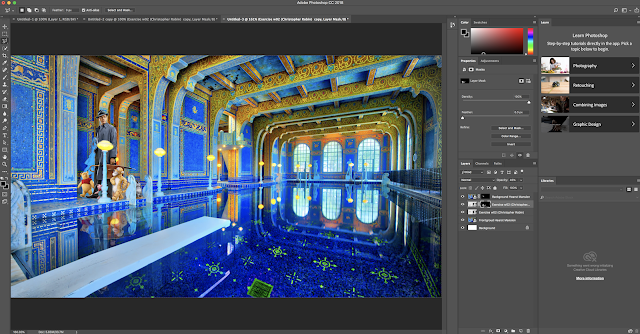
It is the first class of Digital Photography & Imaging. Mr Hafiz introduced us about this module by showing us MIB. After that, we started our first lessons which he taught us how to use photoshop from basic. He taught us how to use masking, playing with the layers, pen tools, selection tools and also taught us how to creating reflection by using it tools. We learn it by photoshop Christopher Robin to Hearst Mansion.
Figure 1.0: Hearst Castle as the background
Figure 1.1: Christopher Robin as the subject
Figure 1.2: The layers and process
Figure 1.3: The final outcome
EXERCISE
The exercise for this week is to photoshop ourself into the Hearst Mansion with all the tools and informations that we have learnt at class.
Figure 1.4: Hearst Castle that I choose to be background
Figure 1.5: Photo of myself that I choose
Figure 1.6: The layers and process
Figure 1.7: The final result
PUBLIC HOLIDAY
Week 02
04/09/18
We don't have lecturer on this week due to pubic holiday.
GHOST HOUSE
Week 03
10/09/18 - 14/09/18
In this week, Mr Jeff put a video link on Google Classroom which guide us on our exercise. In the class, we used masking, match colour, transparency and blending modes to do our exercise.
Video 1.0: Video that given by Mr Jeff on Google Classroom
EXERCISE
The exercise that we have to do in this week is to create a ghost house by using the photo that given in Google Classroom. We have to make it look believable by using those tools that we had taught before.
Figure 2.1: Photos that given to create ghost house
Techniques and tools that used :
- Polygon tool
- Masking
- Blending tools and adjust opacity
- Images > Adjustment > Match colour (select source and the background)
Figure 2.3: Final outcome of the ghost house
RE-COLOURING THE IMAGES
Week 04
17/09/18 - 21/09/18
In this week we learnt about more photoshop skills which are dodge and burn with layers, transform tools, canvas extensions, colouring with influence the original photo, content aware fills, colour adjustment layers and black and white adjustment layers.
In the class's exercise, we practice those tools by recolouring with a portrait of an old man with black and white colour. We also learn how to use eye dropper to find our wanted tones colour. By recolouring it, we have to create different layers for each part like skin, hair, eyes, lips and clothes. This is because we can lock the specific layers and it won't distract other layers.
Techniques and tools that used:
- Recolour with different types and opacity of brushes
- Blending modes (command + U)
- Eye dropper (Press I) to find wanted tones
Figure 3.0 : Portrait of an old man
Figure 3.1: The layers and process
Figure 3.2: Outcome of recolouring
EXERCISE
This week's exercise, we have to choose a portrait to recolour by using the same ways that we have learned in the class and the size have to be 1920 x 1080 (Landscape or Portrait). For the portrait, I have choose Johnny Depp's photo to recolour.
Figure 3.3: Photo that I choose - Johnny Depp
Figure 3.4: The layers
Figure 3.5: GIF of the process
Figure 3.5: Final outcome of recoloured photo of Johnny Depp
CLONE STANMPS/HEALING BRUSH
Week 05(a)
24/09/18 - 28/09/18
This week, Mr Hafiz taught us ways to cover pimples, dark spots, redness, scars by using clone stamps and healing brush. We were given a photo of baby to tried those tools. Not only that, Mr Hafiz also taught us duplicate features by using those tools too.
Techniques and tools that used:
- Clones stamp tools (Hold "alt" and click on the area that we want as the coverage > current layer > aligned)
- Healing brush (Can set the brush type, size and also opacity of it)
Techniques and tools that used:
- Clones stamp tools (Hold "alt" and click on the area that we want as the coverage > current layer > aligned)
- Healing brush (Can set the brush type, size and also opacity of it)
Figure 4.0: Baby face before and after healing and clone stamp tool
After that, we moved on to next tutorial which combining a flag with cloth texture that given by Mr Hafiz. In there, we learned how to let the flag follow the texture of the cloth and make it look believable.
Techniques and tools that used:
- Healing brush
- Desaturate (command + shift = U)
- Blur filter
- Distort filter
To improve my skills for combining something with texture, I do another flag to see the difference.
Techniques and tools that used:
- Healing brush
- Desaturate (command + shift = U)
- Blur filter
- Distort filter
Figure 4.1: Images that given on Google Classroom
Steps by step:
1. Removed the watermarks from the cloth texture by using healing brush and clone stamp tool.
Figure 4.2: Watermarks removed (Screen Shot)
2. Open both file (flag and texture).
3. Select and copy (command + A > command + C) the watermark removed texture file, paste it on top of the flag file.
4. Save it as Flag psd file.
5. On the texture file, we desaturate (command + shift + U) it.
6. Blur it (Filter > blur > gaussian blur > 4 pixels) [DEPENDS].
7. Adjust the image (Image > adjustment > brightness and contrast).
8. Save as Texture psd file.
Figure 4.3: Texture psd file
9. Open the Flag psd file, hide the texture layer. Click on the flag layer and displace it with texture layer. (Filter > distort > displace > set horizontal and vertical as 10 [DEPENDS] > choose Texture psd file).
10. Reveal the texture layer and change the blending mode to multiply [DEPENDS].
Figure 4.4: The layer and process
Figure 4.5: Final outcome
To improve my skills for combining something with texture, I do another flag to see the difference.
Figure 4.6: Texture in psd file
Figure 4.7: Final outcome in psd file
Figure 4.8: Final outcome of Thailand flag
CHANGING ONE'S STRIPES
Week 05 (b)
24/09/18 - 28/09/18
Figure 5.0: Photo and texture that given on Google Classroom
Figure 5.1: The bump in psd file
Figure 5.2: Texture in psd file
Figure 5.3: Final outcome in psd file
Figure 5.4: Final outcome of an old man with snake texture
EXERCISE
Exercise for this week is hybrid animals which are we have to interchange the characteristics of a minimum of two animals by using stamp tool, clone stamping tool, brush, healing brush spot healing brush and mixing brush. We could also can swap the stripes and add textures on it.
Figure 6.0: Example of bird arms that found on Google
Figure 6.1: Bunny that I choose to mix with
Figure 6.2: Photos of Corgi that I want to mix with bunny
Figure 6.3: Texture of giraffe that I want to put on
Figure 6.4: The layers and process of combination for Bunny and Corgi
Figure 6.5: The layers after adding giraffe's texture on it
Figure 6.6: Final outcome
THE CASTLE OF THE PYRENEES
Week 06
08/10/18 - 12/10/18
The week, we have to recreate our own surrealistic floating castle, which was inspired by a painting called "The Castle of Pyrenees" by Rene Magritte. We have to use and combine any tools that we were learned from the last 5 weeks. In this exercise, we have have to use our own texture and generated images to create it and the size of the exercise have to be HD Portrait (1080 x 1920 @72 dpi)
Figure 7.0: The Castle of Pyrenees
Figure 6.1: Example of recreating it
Mr Hafiz are doing it with us in the class. We have to choose a picture that full of clouds as background and a picture of rock that we want to create the surrealistic floating rock.
Figure 7.1: Pictures and images that I choose for recreate "The Castle of Pyrenees"
Figure 7.2: GIF if the process
Figure 7.3: The layers and process
Figure 7.4: Final outcome of recreating "The Castle of Pyrenees'
DALI ATOMICUS
Week 07
19/10/18
The week we learnt about Dali Atomicus which is an artwork by Philippe Halsman in 1948. By doing "Dali Atomicus", Mr Martin helps us to prepare the green screen and other needs for our "Dali Atomicus" Photoshop. Since we don't have studio background photo, we are not allowed to throw buckets of water and we didn't prepare a chair so we were allowed to use images from the internet. Due to we didn't have the photo of water, Mr Jeff shared us the last batch photo to us.
Figure 8.0: Dali Atomicus
Figure 8.1: Some photo that our batch's photoshop
Figure 8.2: Image that I add in
Techniques and tools that used:
- To mask a green screen image easier, we use polygon tool > "Select" > Colour range > Use eye dropper on the green area > hold shift to make it clean.
Figure 8.3: The layers and process
Figure 8.4: Final outcome


Comments
Post a Comment